Getting started
MepoCAD is a 2D drafting program for architects: a ribbon across the top, a type-anywhere command line at the bottom, and the same command names and keyboard shortcuts long-time CAD users already have in their fingers. If you've never opened a CAD program before, that's fine too — every command in this guide is spelled out one click at a time.
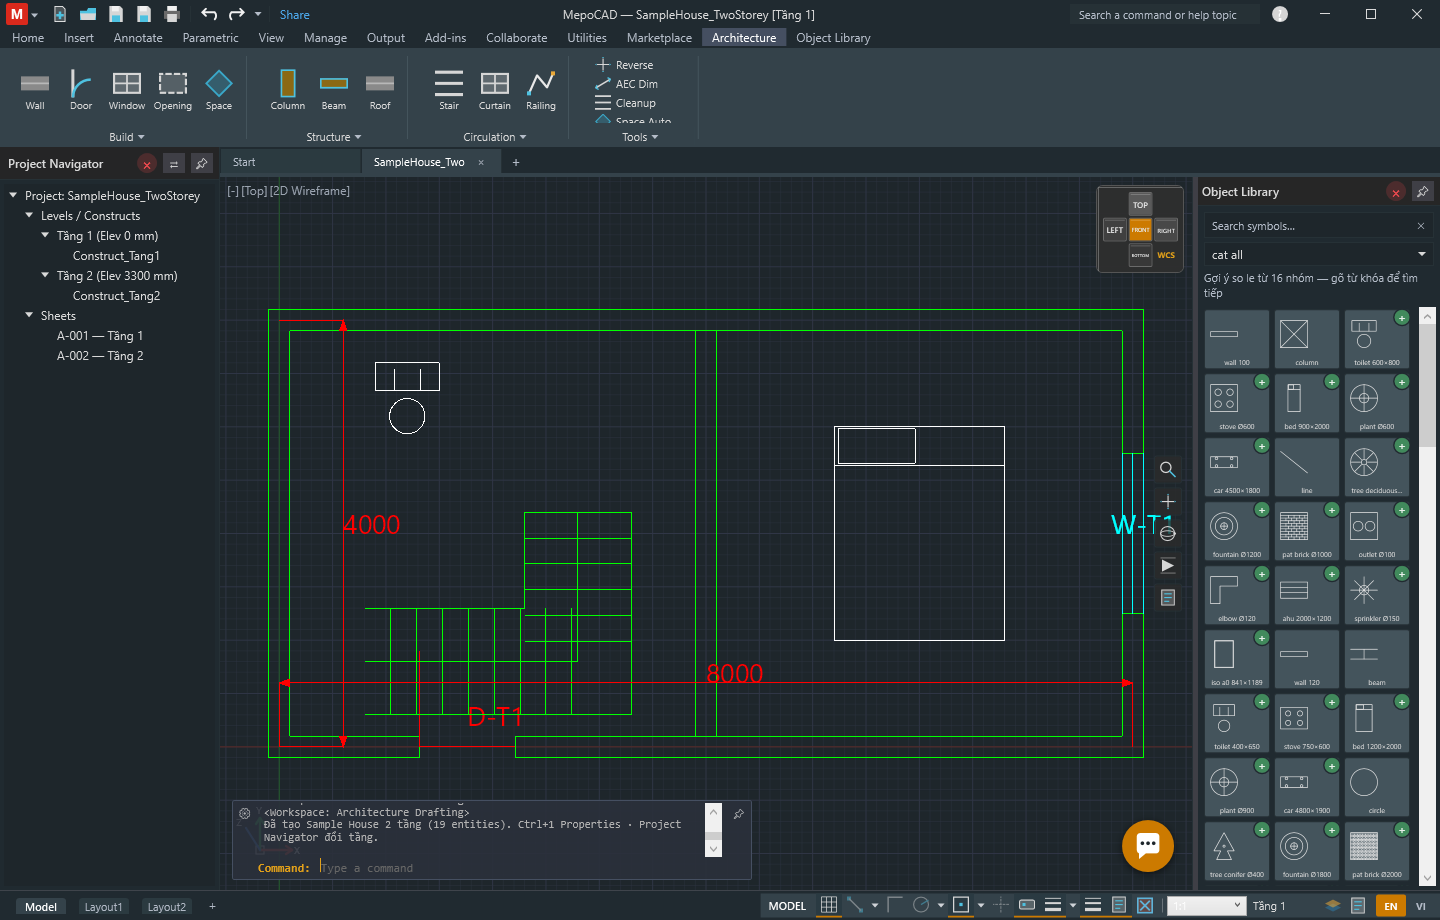
The first time you open MepoCAD.exe you'll see five regions.
Learning where they are is most of what "learning the interface" means:
- Ribbon (top) — tabs like Home, Insert, Annotate, Architecture. Each tab is a shelf of buttons grouped by what they do.
- Canvas (middle) — your drawing. Scroll to zoom, hold the middle mouse button to pan.
- Project Navigator (left dock) — the floors and sheets of the current project.
- Object Library (right dock) — searchable symbols you drag onto the canvas.
- Command line (bottom) — type a command name, press Enter, then answer whatever it asks for.
Every single tool on the ribbon can also be typed. That is not a coincidence — it's the whole design: click while you're learning where things live, type once your hands know the commands. Nothing in this guide requires the mouse and nothing requires the keyboard; use whichever you reach for first.
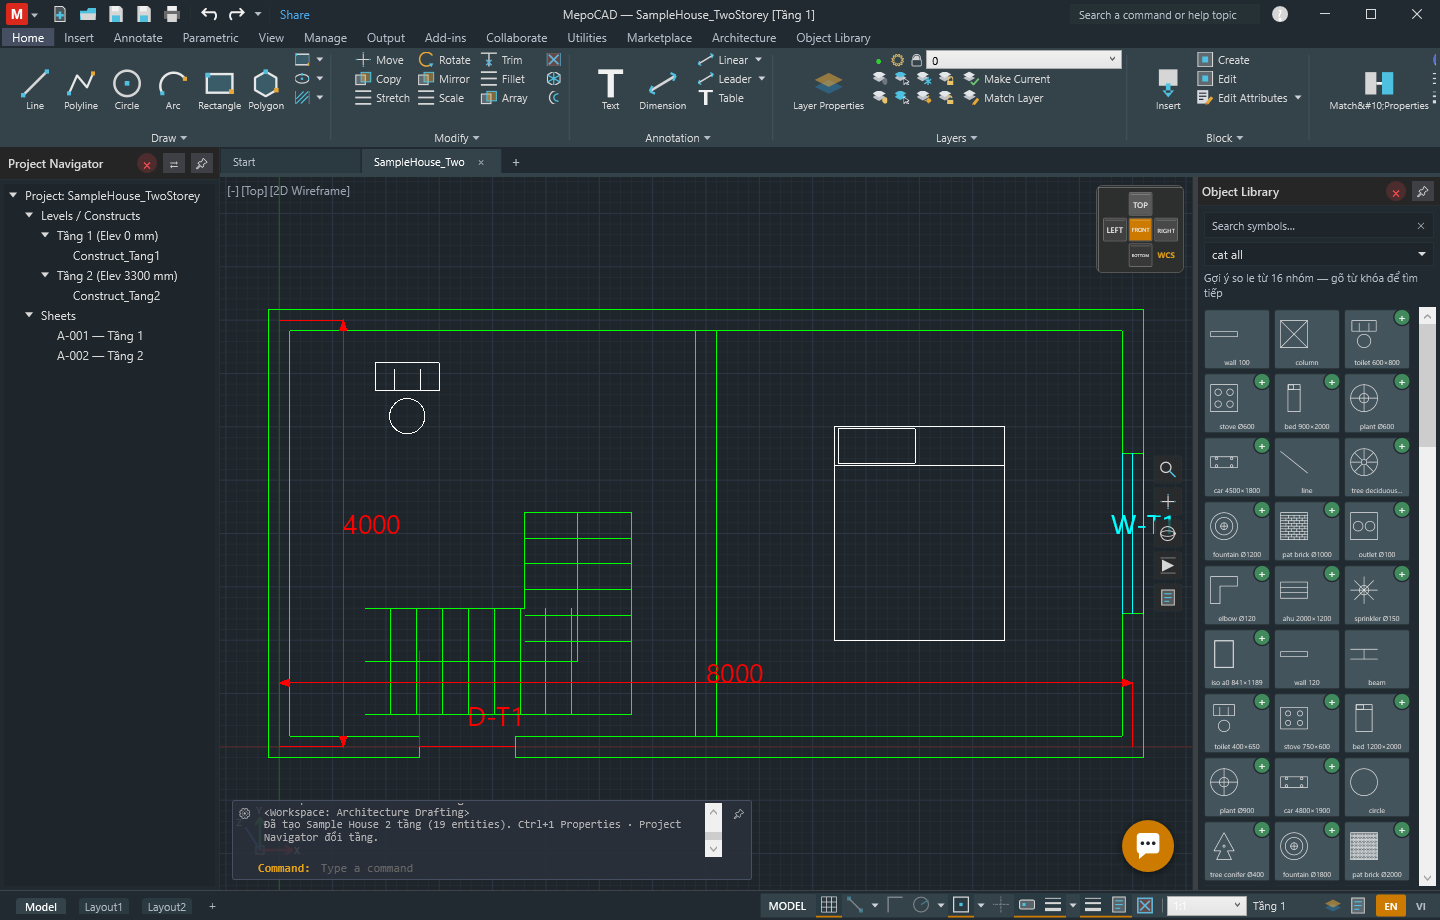
- 1Ribbon tabs — one click switches the whole toolbar
- 2Draw group — Line, Polyline, Circle, Arc, Rectangle, Polygon
- 3Modify group — Move, Copy, Rotate, Mirror, Trim, Fillet, Stretch, Scale, Array
- 4Project Navigator — floors, constructs and sheets
- 5Object Library dock — search and drag symbols onto the canvas
- 6Command history — every command you type is echoed here
- 7Status bar — grid, snap, language and active floor
- Click inside the command line at the bottom (or just start typing — MepoCAD
focuses it automatically) and type
LINE, then press Enter. - The prompt now reads "Specify start point". Click anywhere on the canvas.
- The prompt changes to "Specify next point". Click a second point — a line appears between the two clicks.
- Press Enter (or Space — both confirm a step in MepoCAD, just like in traditional CAD software) to stop adding points and finish the command.
Basic drawing
The Draw group on the Home tab holds the six shapes everything else in MepoCAD is
built from: Line, Polyline, Circle, Arc, Rectangle and Polygon. Each has a one- or two-letter
shortcut you can type instead of clicking — exactly the shortcuts long-time CAD users already
know: L, PL, C, A, REC, POL.
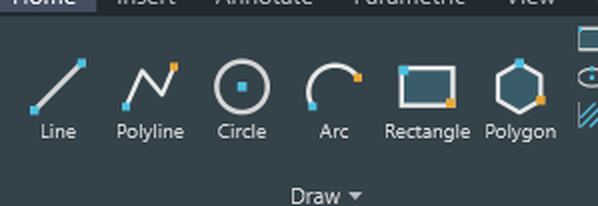
Typing an exact size instead of clicking by eye
Clicking is fine for a rough sketch, but real drawings need exact numbers. Any point prompt also accepts typed coordinates:
1500,900— an absolute point, measured from the drawing's origin (0,0).@4200,0— a relative point: 4200mm to the right and 0mm up/down from the last point you placed. This is the one you'll use most.
- Type
LINEand press Enter. - At "Specify start point", type
0,0and press Enter. - At "Specify next point", type
@4200,0and press Enter — a perfectly horizontal 4200mm line appears, starting exactly at the origin. - Press Enter again to finish (or keep typing more relative points to keep the polyline-like chain of lines going).
All distances in MepoCAD are millimetres unless a command says otherwise — another detail that matches long-standing CAD convention, so drawings exchanged with other software line up without a unit conversion step.
Editing objects
The Modify group sits right next to Draw for a reason: almost nothing gets drawn once and left alone. Move, Copy, Rotate, Mirror, Trim, Fillet, Stretch, Scale and Array cover the everyday reshaping work, and every one of them follows the same rhythm: select something, say what to do to it, then answer a couple of short questions.
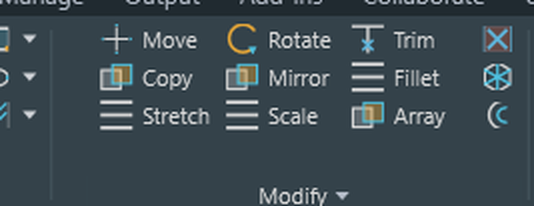
Two ways to select — before or during
You can click one or more objects first and then run a command, or run the command first and let it ask you to "Select objects". Either order works for almost every Modify command.
- Click an object on the canvas to select it (it highlights).
- Type
COPY(orCO) and press Enter. - At "Specify base point", click anywhere — this is just a handle, it doesn't have to be on the object.
- At "Specify second point", type
@1000,0and press Enter — a copy appears 1000mm to the right. Keep clicking or typing more points to drop more copies; press Enter on an empty line to stop.
- Type
TRIMand press Enter. - Press Enter again with nothing selected — this tells MepoCAD "use every visible object as a possible cutting edge", the fast option most people reach for.
- Click the short leftover piece of a line that pokes past a crossing line — it disappears, trimmed exactly back to the intersection.
Ctrl+Z — you don't have to
click Undo forty times to get back to where you started.
Layers & properties
A layer is a named group you can show, hide, lock or color all at once — walls on one layer, dimensions on another, furniture on a third. The Layer Properties button (Home tab, Layers group) opens a table of every layer in the drawing.
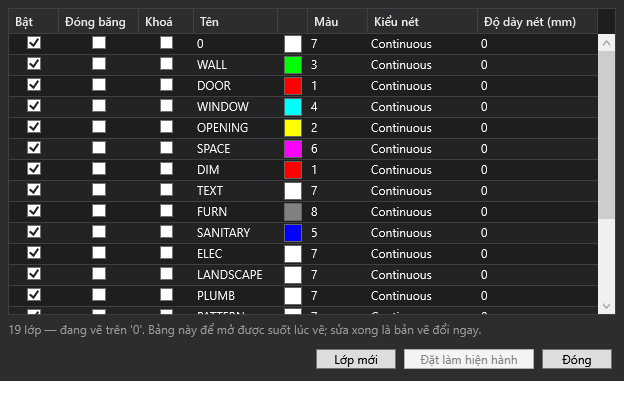
- 1On/off, freeze and lock — one column each, one click each
- 2Layer color — click the swatch to change it
- 3New Layer
- Click Layer Properties on the Home tab.
- Click New Layer, type a name (for example
FURNITURE), press Enter. - Click the color swatch next to it and pick a color.
- Click Set Current so anything you draw next lands on this layer, then close the dialog.
Copying properties between objects
Match Properties (MA) is the fast alternative to opening
a dialog for every object: click a source object, then click every object you want to match it —
color, linetype, lineweight and transparency all copy across, not just the layer.
Walls, doors & windows
The Architecture tab is where MepoCAD stops being a generic line-drawing program and starts understanding a building. WALL draws a chain of walls the same way LINE draws a chain of lines — click a start point, click the next point, keep going, press Enter to stop. The difference is that every corner cleans itself up as you draw: two walls meeting at a T or an L join into a single clean joint automatically, with no stray line poking into the wall cavity.
- 1WALL
- 2DOOR — click a point on an existing wall to insert it there
- 3WINDOW — same idea, for a window opening
- 4SPACE — a room boundary with an area label
- 5Cleanup — same as typing WALLCLEANUP
- Type
WALL, press Enter. At "specify start point", type1500,900and press Enter. - At "specify next point", type
@4200,0and press Enter — a 4200mm wall appears, using whatever wall style and thickness are currently active. - Press Enter again to finish the WALL command.
- Type
WALLCLEANUP, press Enter, then press Enter once more at "Select walls or [All]" to clean up every wall in the drawing at once. - Type
DIMLINEAR, press Enter, click one end of the wall, click the other end, then click a third point below the wall to place the dimension line — the length prints itself.
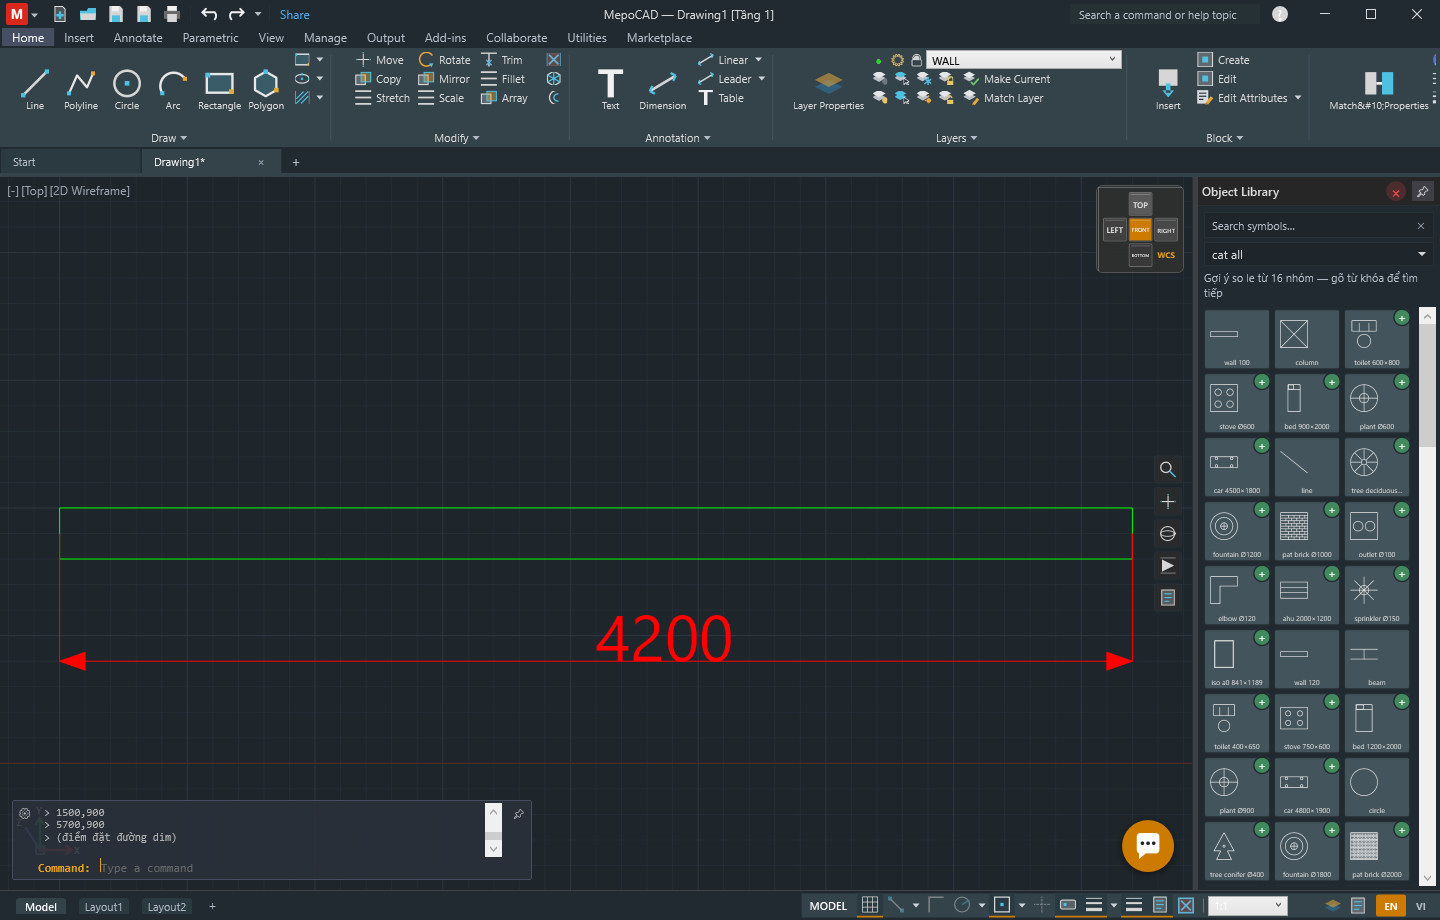
- 1Every line you typed, in order — scroll up to review a whole session
- 2The finished dimension — 4200, read straight off the wall
DOOR and WINDOW both work by clicking a point directly on top of an existing wall — MepoCAD finds the nearest wall and inserts the opening into it at that point, at the width defined by the current door or window style.
Multi-language symbol library
The Object Library dock on the right is always there, and the Object
Library ribbon tab opens a larger, full-canvas version of the same thing — hundreds of ready
blocks (doors, windows, furniture, fixtures) you search by keyword and drag straight onto the
drawing. Dragging a block is exactly the same as typing INSERT and naming it.
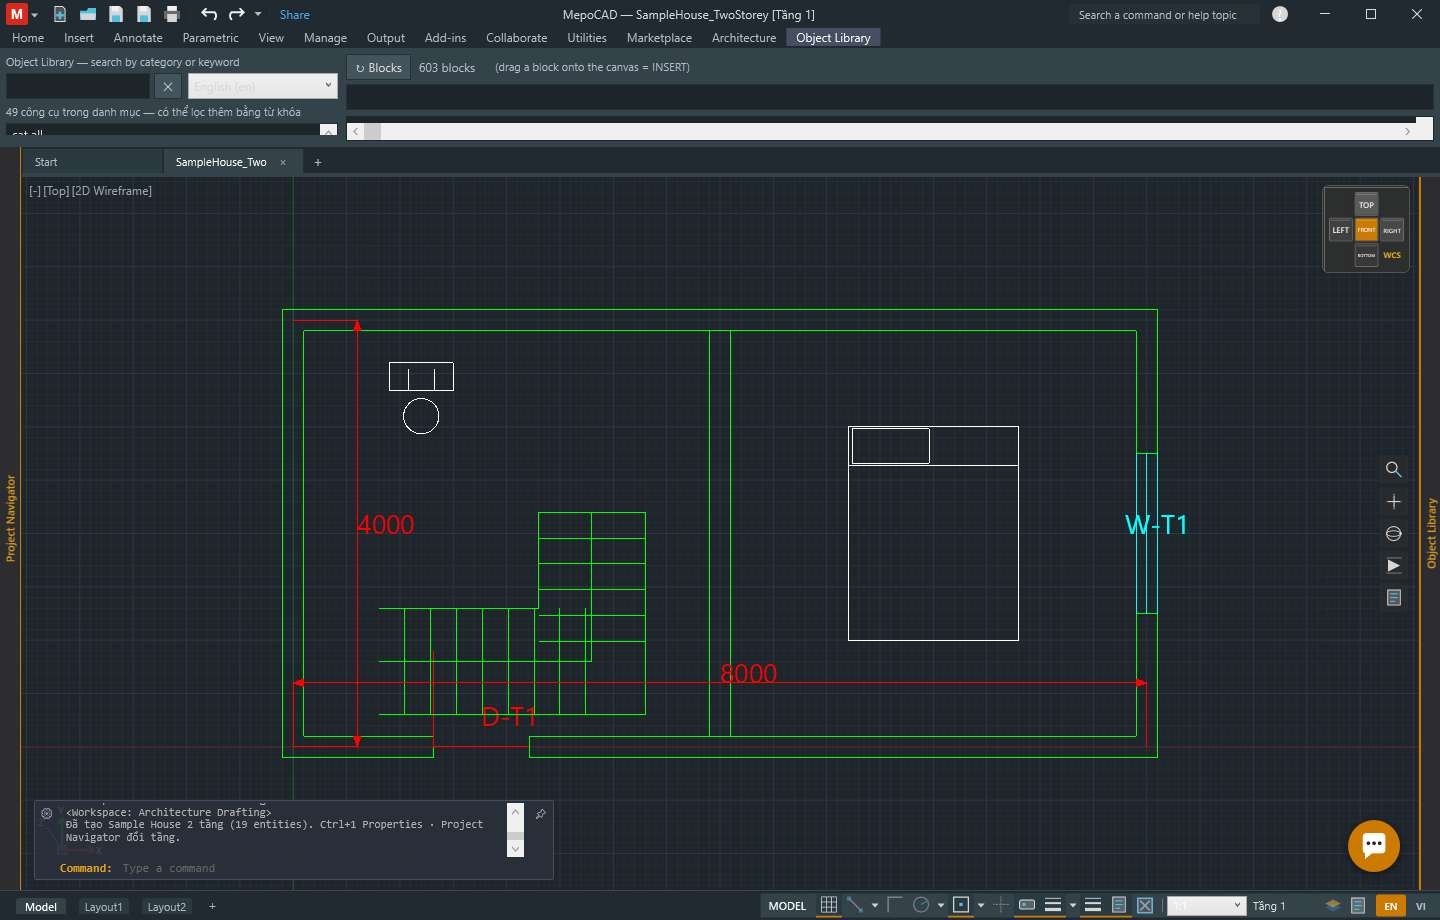
- 1Blocks — switches this tab into a full block browser, with a live count of every block in the drawing
- 2Type a keyword to filter — drag a result onto the canvas to insert it
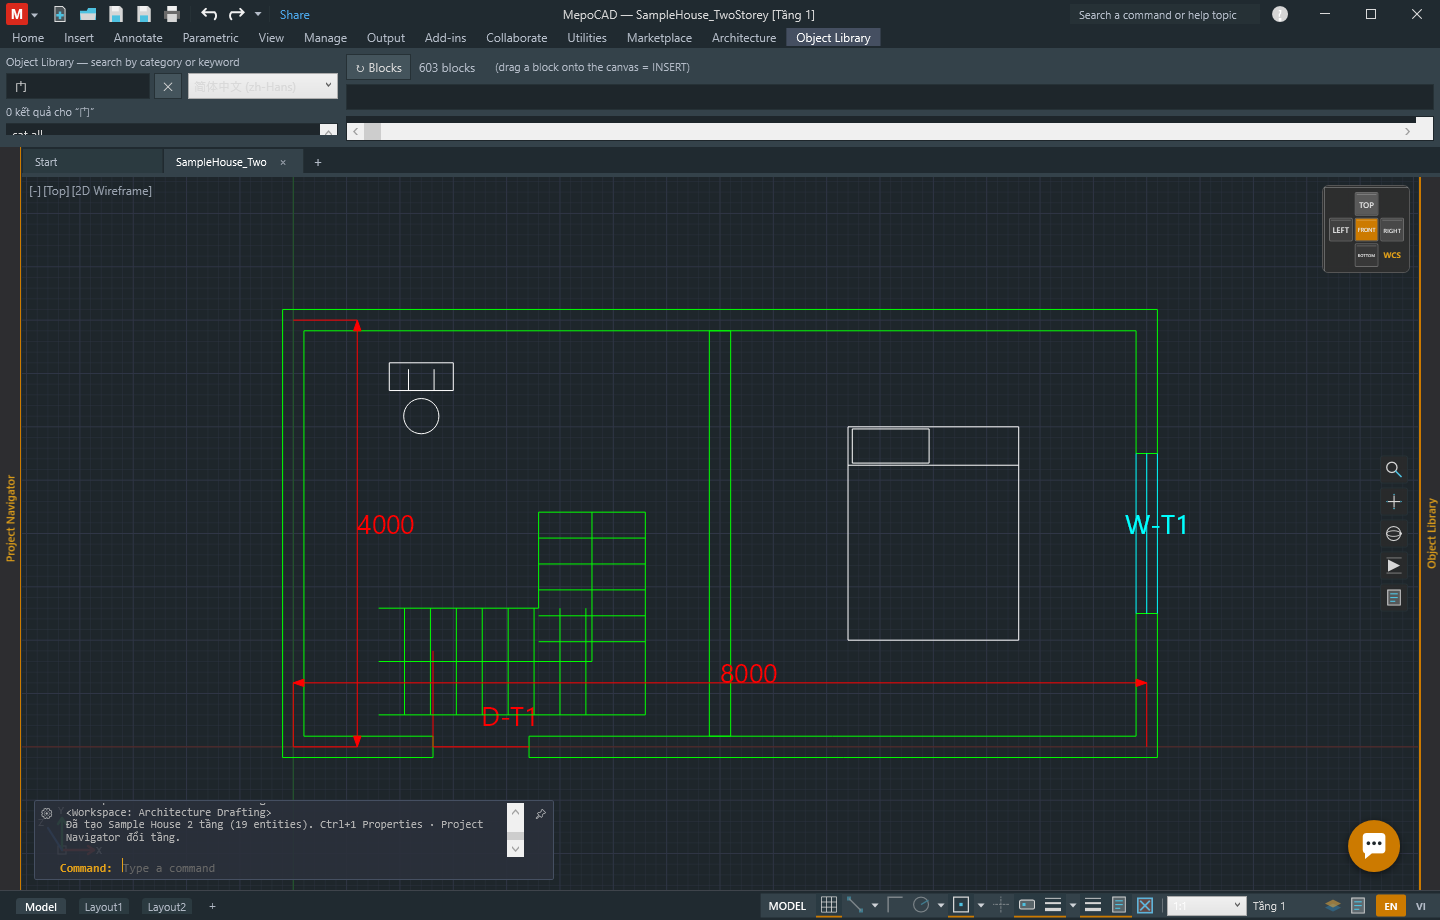
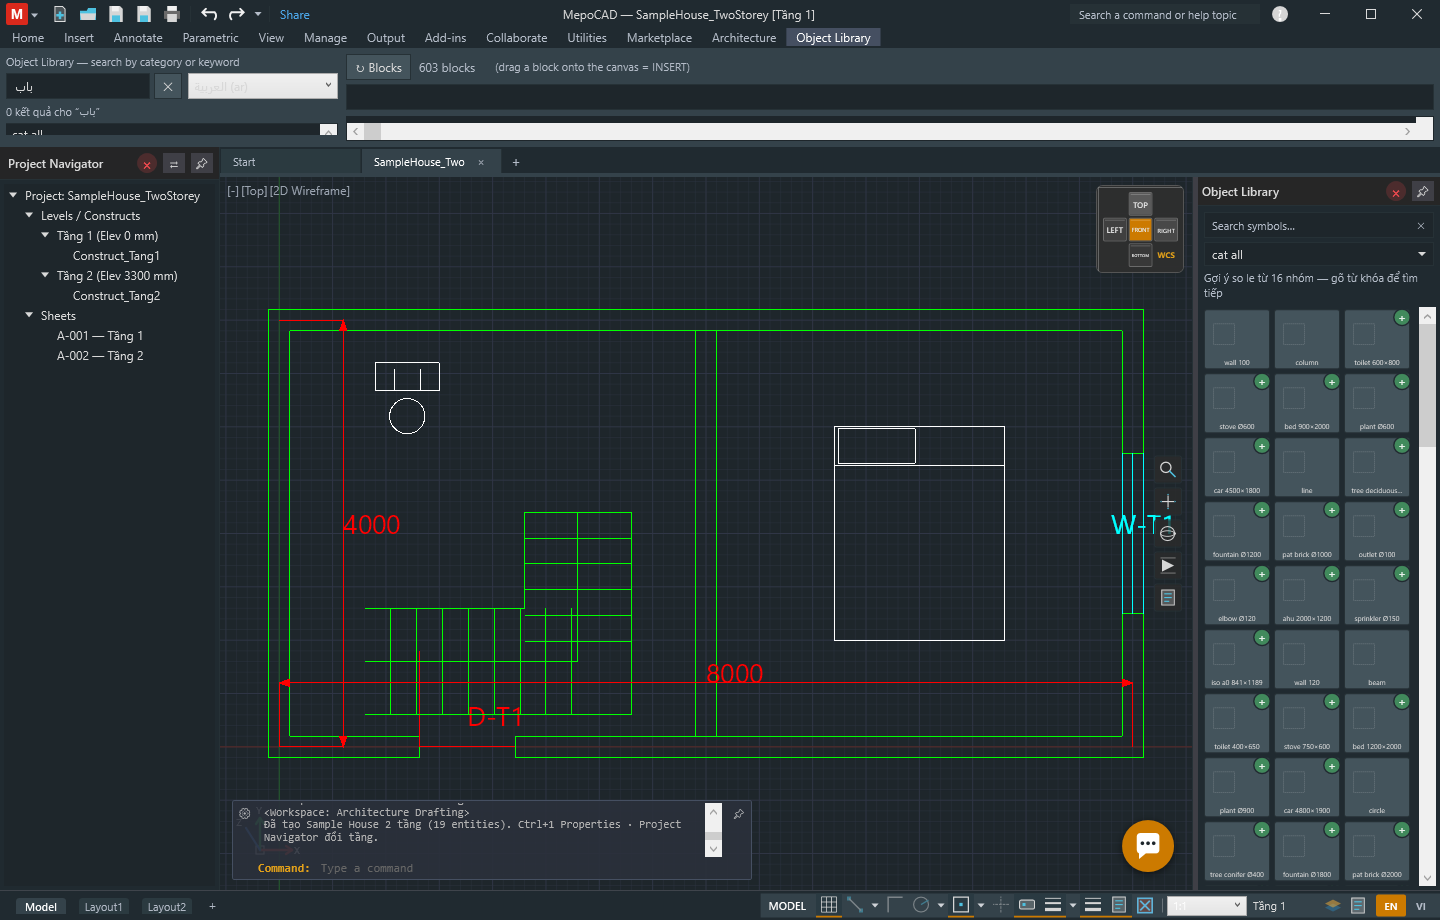
Search in whatever language you draw in
Type a keyword in the search box in any script — Vietnamese, Chinese, Arabic, Cyrillic, and more — and MepoCAD recognizes which language you're typing just from the characters themselves, and relabels the search panel to match. This works for up to 23 scripts, no menu to switch first.
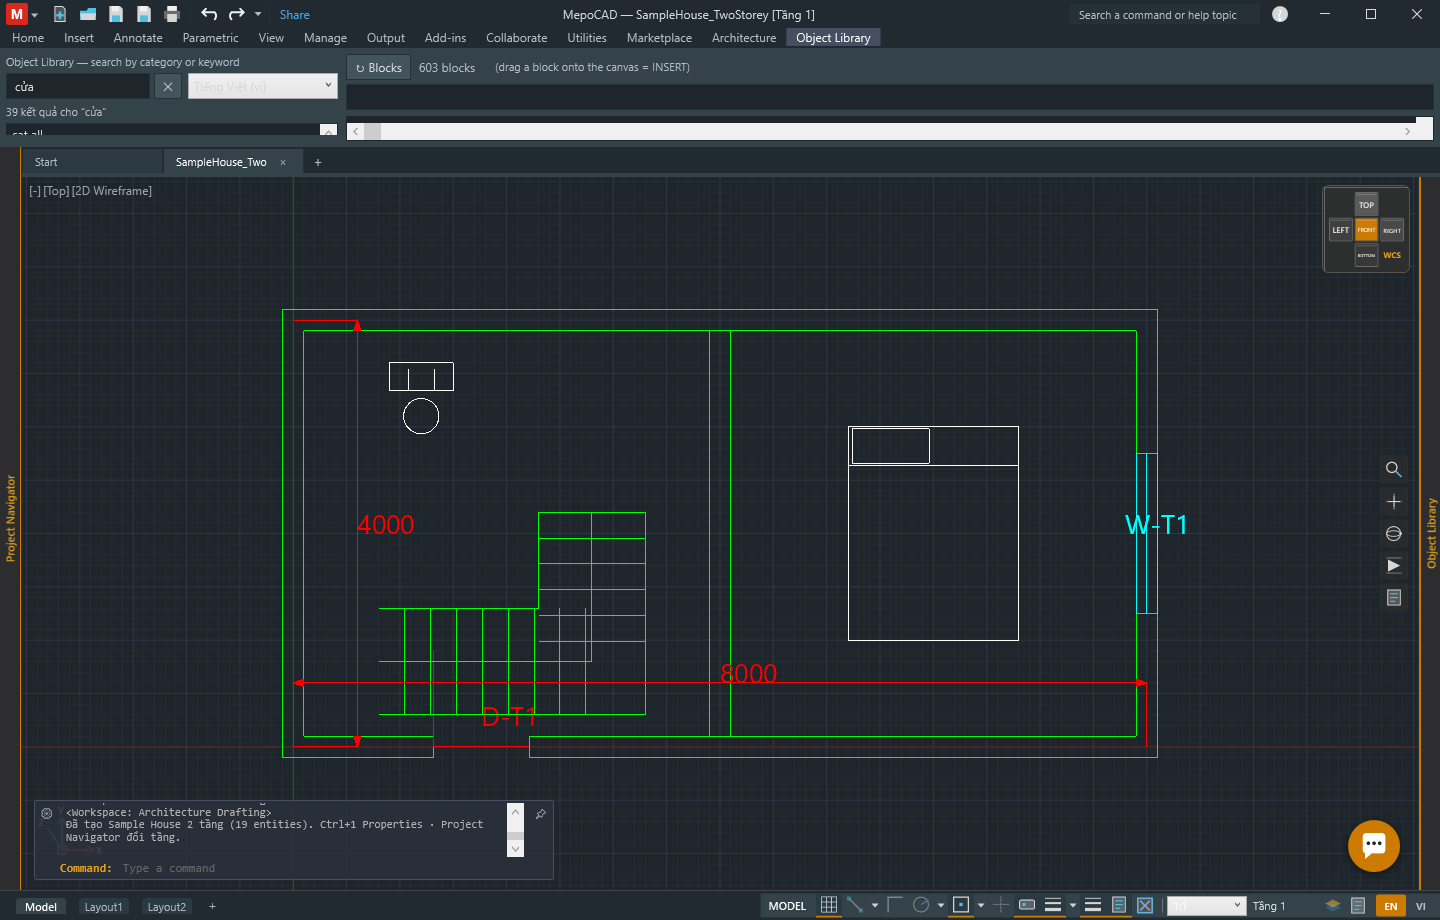
- 1Typed in Vietnamese: "cua" (door)
- 2Detected automatically from the script you typed
- 3Matches found for that keyword
Annotation & dimensions
The Annotate tab covers everything that describes a drawing without being part of the building itself: single- and multi-line text, dimensions, leaders (a note with a pointer arrow) and tables.
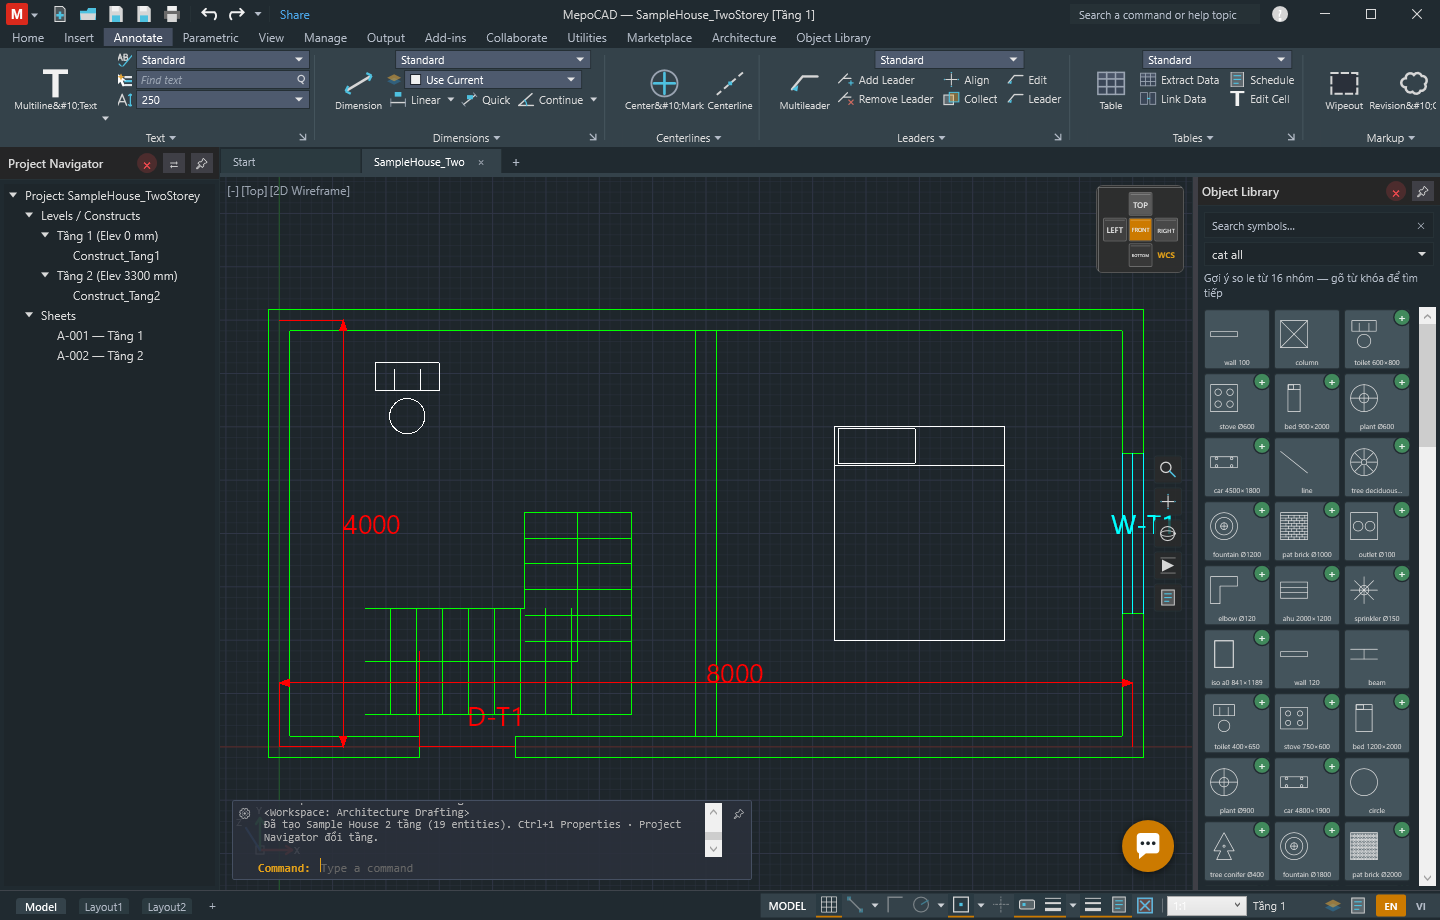
- 1Text — single-line and multiline
- 2Dimension — Linear, Aligned, Continue
- 3Multileader — a note with a pointer arrow
- Type
DIMLINEARand press Enter. - Click one point, then click a second point — any two points, not necessarily an existing object's corners.
- Move the mouse away from the two points and click a third time to set how far the dimension line sits from your points, and the measurement is drawn and labeled automatically.
Pressing Enter instead of clicking a first point switches DIMLINEAR into "pick an object" mode — useful for straight lines and polyline edges. Options in square brackets (Mtext / Text / Angle / Horizontal / Vertical / Rotated) let you override the label text or force the dimension's direction; type the bracketed letter shown in the prompt to use one.
Multi-story projects
A real building is more than one floor, and MepoCAD keeps every floor of a project in one place: Project Navigator, the dock on the left. Each floor is its own "construct" with its own elevation in millimetres above the ground floor; Sheets underneath are the printable layouts, one per floor by default.
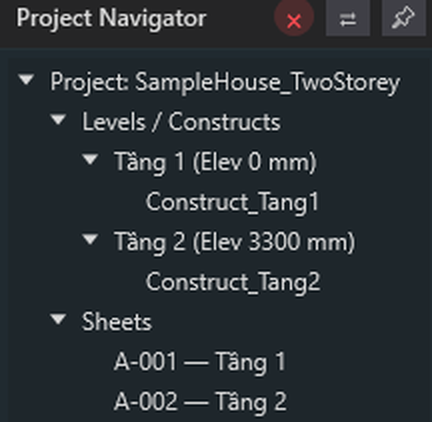
- 1Floor 1 — elevation 0 mm
- 2Floor 2 — elevation 3300 mm
- 3Sheets — one printable layout per floor
- In Project Navigator, double-click a floor's construct (for example
Construct_Tang2) — the canvas switches to that floor. - Or use the floor dropdown at the bottom-right of the status bar — same effect, without leaving the canvas.
- Anything you draw next belongs to whichever floor is active; the title bar always names the current floor so you can tell at a glance.
Walls draw at a real height above their floor's elevation, so a ground-floor wall and a second-floor wall stack correctly when you look at the building in section — the height is stored on the wall itself, not guessed from whatever floor happens to be open when someone views the file later.
Import & export (DWG/DXF)
MepoCAD's own project files use a .mepocad.json format
(SAVEAS to write one, OPEN to read one back) — but drawings rarely stay in
one program for their whole life. IMPORT and EXPORT are the two commands
that move geometry in and out.
- Type
IMPORTand press Enter. - Type the path to a
.dxfor.dwgfile and press Enter. - The file's geometry merges into whichever floor is currently active — existing objects on that floor are untouched.
- Type
EXPORTand press Enter. - Type
DXF(a standard text-based CAD format most software can open) orSVG(a plain image, good for sharing a quick preview) and press Enter. - Type the destination path and press Enter — pressing Enter with nothing typed at the format step defaults to DXF.
.aec.json file saved alongside the
DXF — open the DXF alone in another program and you'll still see correct 2D geometry, just without
MepoCAD's own wall/door/window intelligence layered on top.
Printing
PLOT sends the current view to a PDF file or a real printer; PAGESETUP saves a named paper size, orientation and scale so you don't have to set them up again next time.
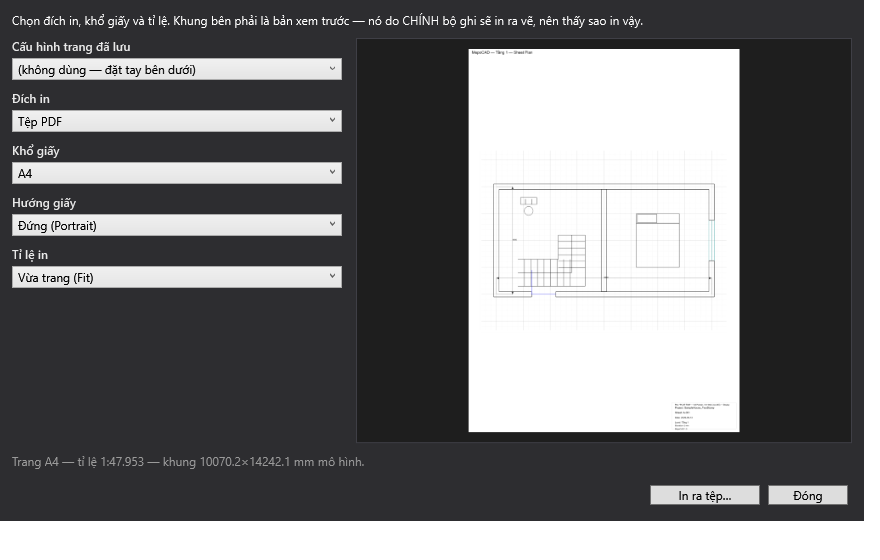
- 1Destination — PDF file or a real printer
- 2Paper size and orientation
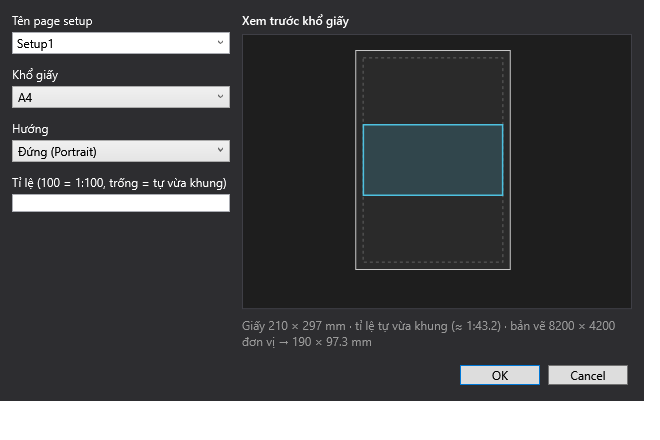
- 1Paper size for this sheet
- 2Print scale — leave blank to auto-fit
- Type
PLOTand press Enter (or click Plot on the Output tab). - Set Destination to PDF file, Paper size to A4, and Scale to Fit to page.
- Check the preview on the right — it mirrors exactly what the printer will produce, not just an approximation.
- Click Print to file and choose where to save the PDF.
Voice-typed command assistant
The AI Assistant panel lets you describe what you want in a plain sentence — Vietnamese or English — instead of remembering a command name. It never draws anything by itself: it shows you the exact commands it's about to run, in the same syntax you'd type by hand, and waits for you to click Run.
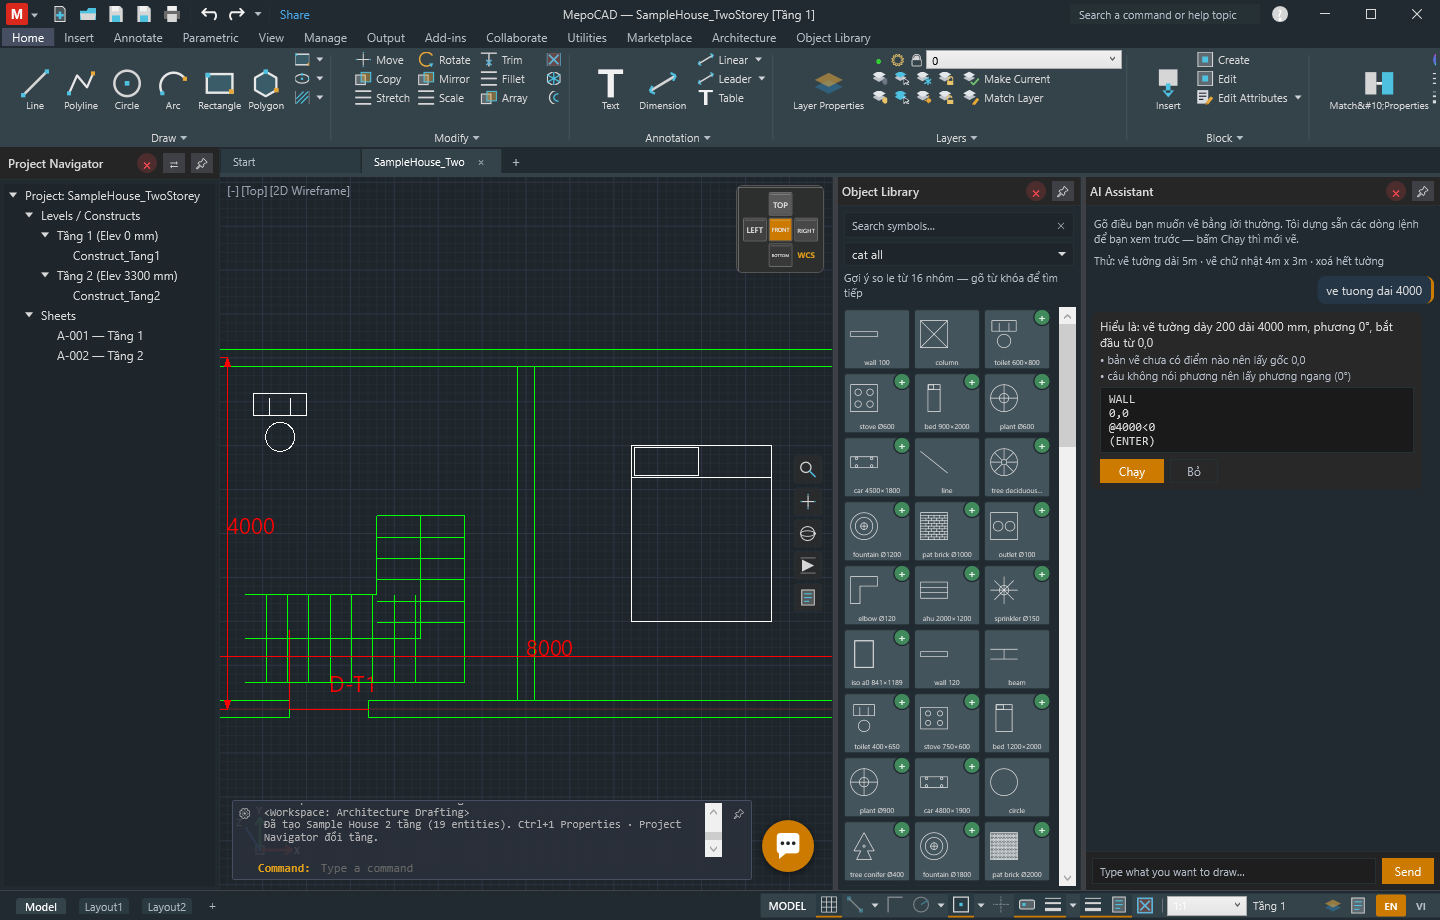
- 1What you typed, in plain Vietnamese
- 2How the assistant read it — and what it assumed, spelled out
- 3The exact commands it will run — same syntax as typing them yourself
- 4Nothing happens to the drawing until you click Run
- Open the AI Assistant panel from the icon at the bottom-right of the canvas (or press its shortcut).
- Type "vẽ tường dài 4000" (Vietnamese for "draw a wall 4000 long") or "draw a wall 4000 long" in English, then press Enter.
- Read the assistant's reply — it states any assumption it had to make (wall thickness, starting point, direction) in plain words, then shows a command block.
- Click Run to draw it, or Discard if it guessed wrong — nothing is committed either way until you choose.
The assistant understands a fixed set of actions — draw, erase, copy, move, undo, rotate, mirror — combined with object names (wall, door, window, column, beam, stair, room, line, circle, rectangle, polygon, arc, polyline). The verbs are recognized in Vietnamese and English only; the object names are recognized in many more languages, drawing from the same glossary that powers the symbol library search in Chapter 6.
Interface language
Two buttons in the status bar — EN and VI — switch the entire ribbon, menus, dialogs and dock panels between English and Vietnamese instantly, no restart required.
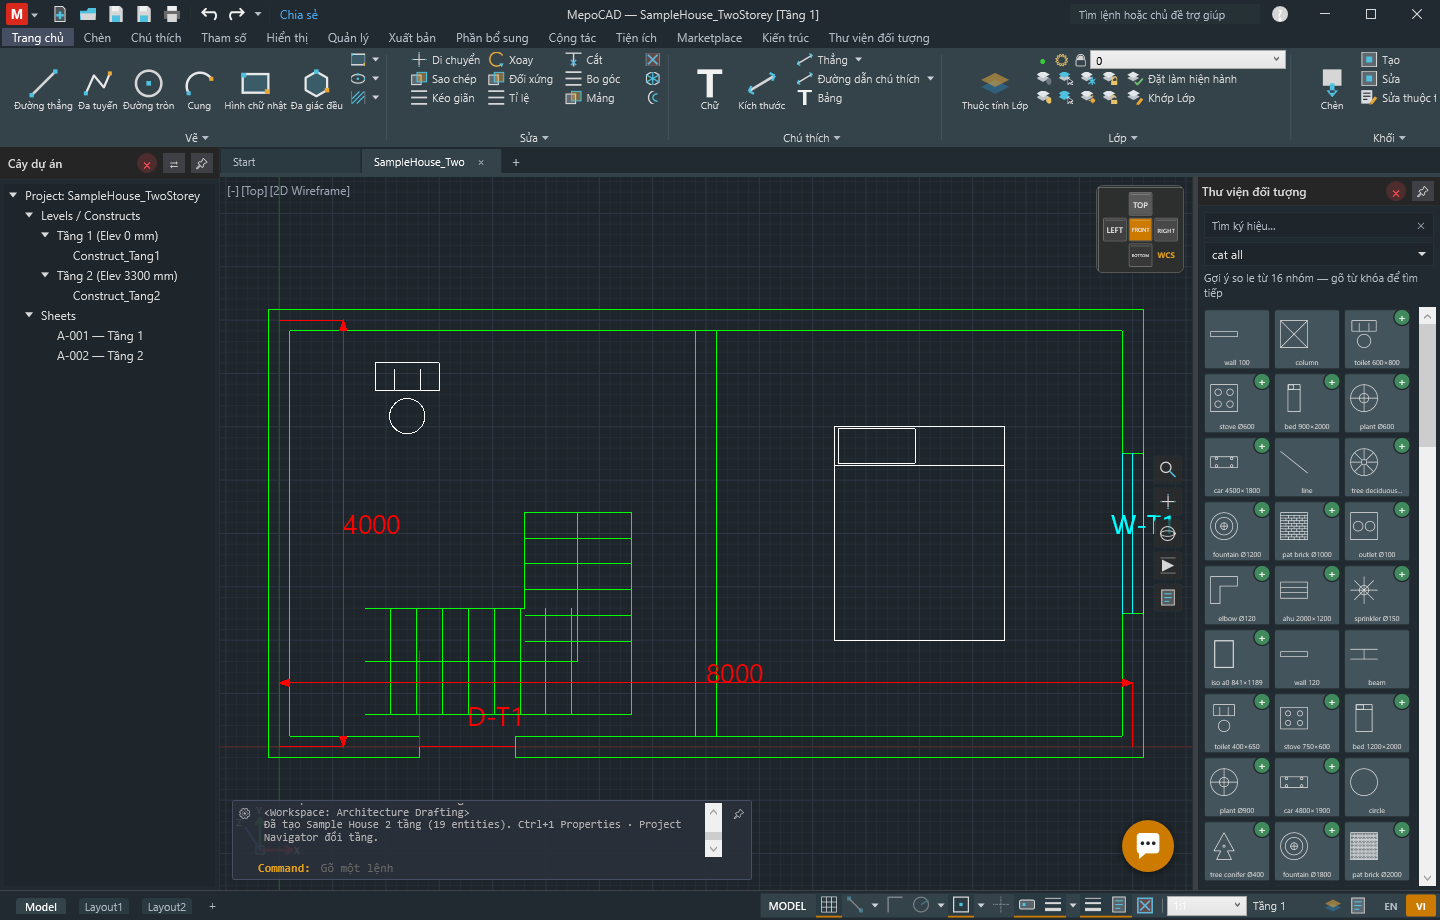
- 1Every ribbon tab relabeled — no restart needed
- 2The same EN / VI switch, now showing VI active

- 1Grid, snap and osnap toggles
- 2Active floor — switch without opening Project Navigator
- 3EN / VI — switch the interface language instantly
- Look at the bottom-right of the window for the EN / VI pair.
- Click the one you're not currently using — every tab, button tooltip, dialog and dock panel switches immediately.
Utilities & sync
The Utilities tab is a toolbox of smaller power tools that don't fit neatly under Draw or Modify: exploding attributes, swapping one block for another everywhere it's used, masking text behind a hatch, renumbering, merging layouts, and more.
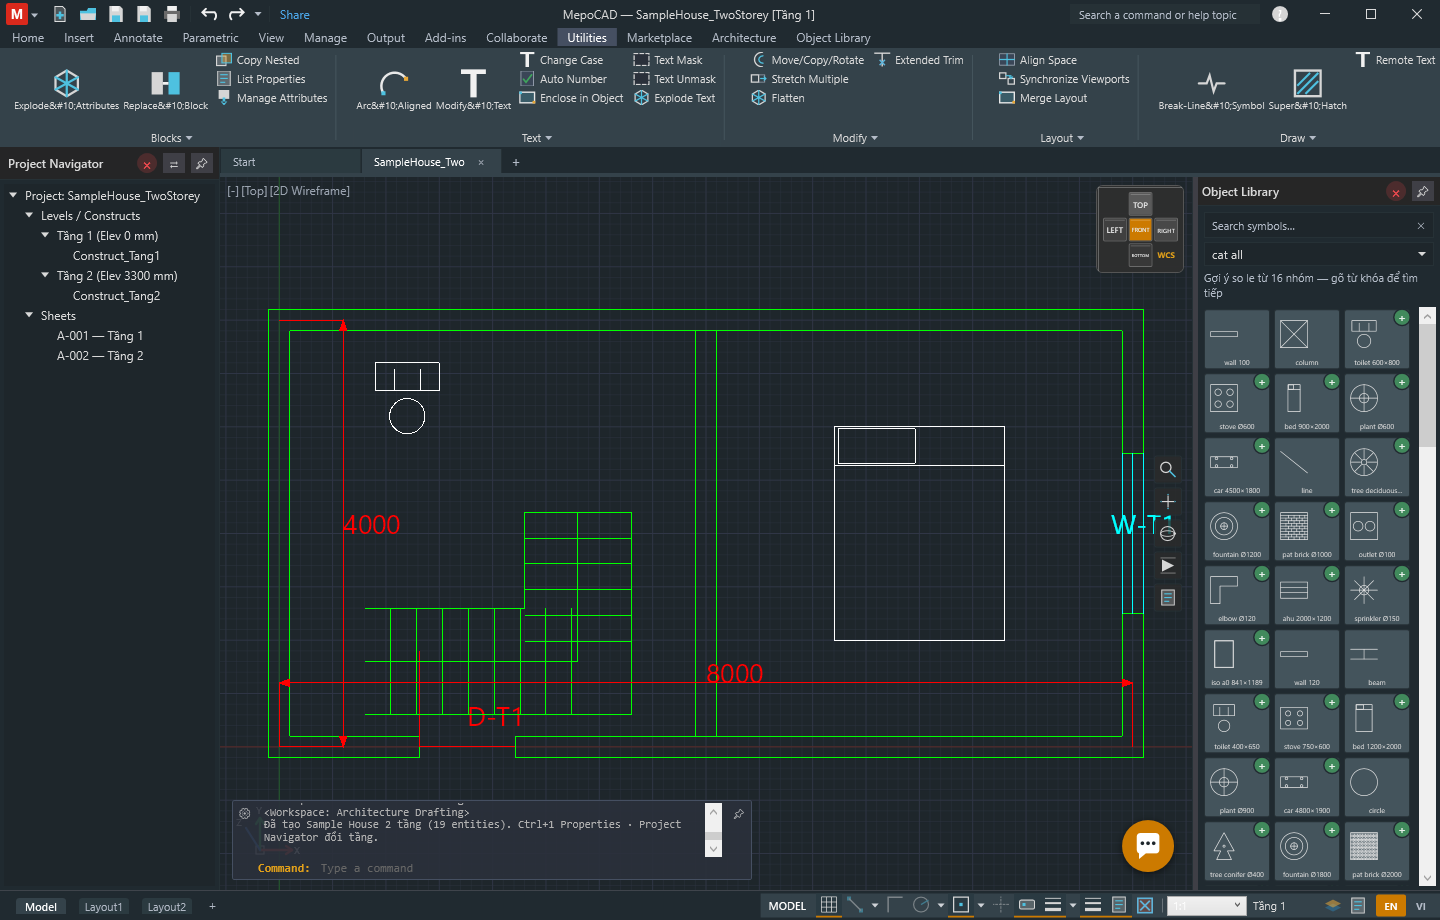
- 1Block housekeeping — explode attributes, swap one block for another
- 2Text power tools — mask, unmask, renumber, change case
Carrying your own styles between machines
The bundled symbol library is read-only and identical on every install, so there's
nothing to sync there. What is personal to you are the wall, door and window styles and
materials you've defined yourself — and LIBEX / LIBIM move exactly that,
as one JSON file you carry however you like (a shared drive, a USB stick, Dropbox — MepoCAD doesn't
need a server of its own for this).
- On the first computer, type
LIBEX, press Enter, then type a file path such asC:\Sync\my-library.jsonand press Enter. - Copy that file to the second computer, by any means you like.
- On the second computer, type
LIBIM, press Enter, then give it the same file path. - Styles with the same name are overwritten by the file you just imported (so the newest edit always wins); styles that only exist on the second computer are left exactly as they were — importing never deletes anything.
Troubleshooting & FAQ
"Windows protected your PC" on first run
MepoCAD's Windows build isn't code-signed yet, so SmartScreen shows a warning the very first time you run it. Click More info, then Run anyway. Before you do, it's worth comparing the file's SHA-256 hash against the one published on the download page, so you know the file wasn't corrupted or tampered with in transit.
"To run this application, you must install .NET"
MepoCAD needs the .NET 8 Desktop Runtime. Windows shows a direct download link the first time it's missing, or you can get it straight from Microsoft's official .NET 8 download page.
Cleaning up a drawing that's picked up clutter
PURGE lists every unused block, layer and style — nothing is removed until you tick what you want gone and click the delete button, so it's safe to open just to look.
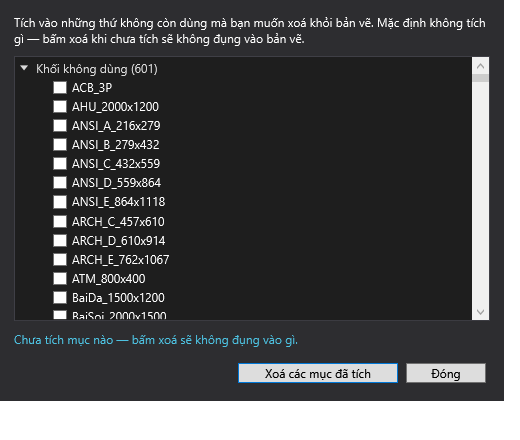
- 1Unused blocks, layers, styles — tick what you want gone
- 2Nothing is deleted until you click this
Finding text across a whole drawing
Find & Replace searches every text object and label in the drawing at once, instead of hunting by eye floor by floor.
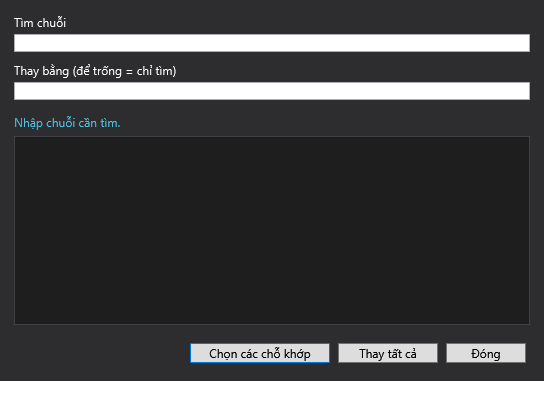
- 1Text to find — searches every text and label in the drawing
- 2Replace All
"Nothing happens when I click / type"
Check the last line of the command history at the bottom — MepoCAD is almost always mid-way through a command and waiting for a specific answer (a point, a distance, a yes/no). Press Esc to cancel whatever is active and get back to a plain "Command:" prompt, then try again.